CORE XY 3D Printer - Add a BLTouch Probe
How to add a BLTOUCH probe to the ReP_AL CORE XY 3D Printer
A BLTouch probe is a great addition to the printer. The probe scans the print surface and automatically adjusts height of the bed using the Z axis steppers when printing the first few layers. This ensures you get a really nice first layer on your print.

There are 2 similair looking sensors on the market, the BLTouch and the 3DTouch. This tutorial is for the original BLTouch V3.0 (I have no experience with the cheaper 3DTouch).
The V3.0 BLTouch sensor can be ordered here
Print the BL touch upgraded Fan shroud
This is available on the GITHUB site (BLTouch.stl) or on my Thingiverse page The BLTouch is attached to the new fan shroud (with the wire harness at the rear) with M3 Bolts and locking nuts.

Connection to the MKSBase V1.3 Board
The BLTouch is connected as follows to the MKSV1.3 board. The Z endstop sensor is not required anymore. Please leave the sensor in place and connect it to ZMax on the MKs Board. This will allow its use if we need it later.

Connections
BLTOUCH Orange --> P1.23 MKS Board
BLTOUCH Red --> 5V MKS Board on Zmin
BLTOUCH BLACK --> GND
BL Touch Grey --> P1.28 MKS Board ZMin
Code Changes on the MKS MicroSD Card.
To activate the BLTouch sensor we need to make the following changes to the config.txt file on the micro SD card in the MKS board.
First we need to enable the servo of the BLTouch to activate and retract the sensor pin.

(Code segment is available on GITHUB MKS Code.gcode)
Then we need to enable the probe function and tell the MKS board where the probe is connected. In this case its on the Zmin pin which is 1.28. If the probe is not activating then remove the ! to switch it from active high and low

(Code segment is available on GITHUB MKS Code.gcode)
If you find the printer stopping suddenly then try enabling the zprobe.debounce_ms.
Then we add the type of leveling strategy we want to use. there are various leveling strategies to use.
Rectangle Grid Strategy
The printer bed is divided into squares (grid.size). The BLTouch probes each area of the bed and reports the distance offset.

(Code segment is available on GITHUB MKS Code.gcode)
3 point system Strategy.
The BLTouch will probe 3 points on the bed and then calculate the bed angle based on these 3 points
The point 1 - 3 are the positions the BLTouch will probe on the print bed. The values are for a 300mm print bed. If your bed is a different size you need to adjust the coordinates.

(Code segment is available on GITHUB MKS Code.gcode)
Controlling the BLTouch Probe
When powering on the printer the BLTouch will go through a test program where the pin in lowered and raised. After this test the BLtouch should show a solid red light. If its blinking something is wrong and the BLTouch needs to be rest. this can be done by powering off and on the printer or resting the probe using GCode. (this code is ran as a button on the TFT screen Option 2)
We can control the BLTouch with various methods. We can use CURA to control the probe before each print, and/or modify the TFT display to control the probe.
Overview of BLTouch V3.0 Codes Sept 2019:

Option 1 : Use CURA Printer G Code.
To activate the probe sequence the following code can be added to the CURA printer setup before the code you currently have to start the printer..
CURA will then automatically add the code to the GCode slicer before each print.
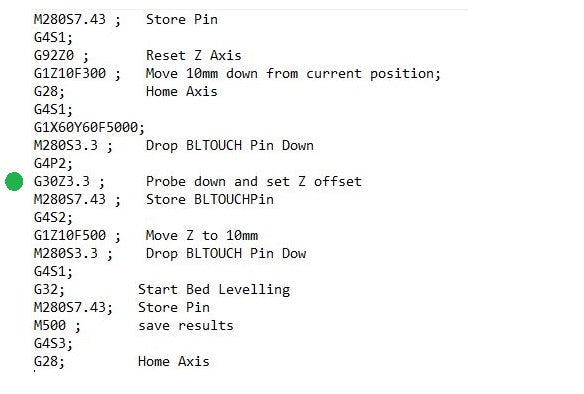
This function of the code is annotated on each line. Basically the printer bed is lowered, then the printer is homed. The BLTouch is activated the bed Z height is probed and set (G30Znn) and the bed levelling is probed. .
Before running the CURA code ensure that the BLTouch pin is activated and retracted correctly. The M and S codes are working on my BLTouch V3.0, but i have also seen other M and S codes used to activate the BLTouch (probably earlier versions of the probe)
To test the pin activation and retraction you can use the Test 0 code from the GITHUB site. this code will simply store the BLTouch Pin, move the printer and then activate the BLTOuch pin. Just load this GCode file to your printer and run it.
CURA Code
The ZOffset in this code is 3.3mm. This is the distance between the BLTouch probe activation point and the print nozzle. If you are using my STL file and the ReP_AL print head the value will be very similar.... but you may have to adjust this value to have the correct offset of the print nozzle to the probe activation point.
(CURA code segment is available on GITHUB CURA Startup.gcode )
Option 2: Update TFT Screen to Control BLTouch
The TFT screen can also be used to control the BLTouch probe by using the leveling function and custom buttons. If you run these codes before printing then the CURA code is not necessary.
All the TFT config files from my printer can be found here (TFT Config.zip)

Activate Leveling Button
To activate the leveling button in the TFT Screen, update the mks_config.txt as below (on the SD card entered into the TFT screen). This will activate the leveling mode to auto mode and will control the BL touch pin and leveling procedure.
The comman line for the autoleveling must be added as 1 line with no spaces and a ; seperating each code section.
Please note : Any coordinates entered into the code here (5 point manual leveling) willbe overided by the MKS board coordinates saved in the 3Point or Rectangle leveling strategy.

(Code segment is available on GITHUB MKS_Config.zip)
Custom TFT Buttons

The TFT allows custom buttons to be created. Here 4 buttons are setup to control the BL Touch. Pressing MORE on the TFT screen will display these 4 buttons
Button 1: Probe Z Height - Moves the BLTouch to the center of the bed and probes for the Z height. The Z height (offset) is set with the line G30Z3.3 . 3.3 is the offset in mm and will need to be adjusted for your printer.
Button 2: Reset BL Touch - resets the BL Touch if after starting the BLTouch is still flashing
Button 3: Home Axis - Homes X and Y (but raises the bed first)
Button 4: Test BLTouch Pin In/Out tests the BLTouch servo is working

(Code segment is available on GITHUB MKS_Config.zip)
The icons for the 4 buttons are on the GITHUB site in the folder mks_pic

these icons can be modifed using a .bin conversion software. The icons are 16bpp, width =78 pixels, height =104 pixels.
Option 3: Use the Z Axis End Stop and BLTouch Probe.
Setting the Z-Offset using the TFT buttons and CURA Code can be cumbersome as it requires some dedicated coding for each printer. Another Option is to use the BL-Touch strictly as a probe (to get the bed levelling coordinates) and use the Standard Z End Stop microswitch to set the bed height to the print nozzle.
Step 1:
First we need to plug the Z-Axis end- stop microswitch into the Z-Max plug on the MKS board (Z-Min is being used by the BLTOuch). We now redefine the Z-Axis min switch to be controlled by the Z-Axis Max plug which is 1.29.

When homing the X, Y and Z axis will be set as normal by the endstops. When setting the Z axis height make sure that the bed is at 0 when the nozzle is in the center of the heat bed. (This is the axis of rotation for the bed levelling).
Step 2:
Adjust the Probe coding on the MKS board not to switch off the ZMin endstop by adding a # before the Gamma_min_enstop line of Code.

Step 3:
Adjust the Code on the TFT Levelling button not to include any G30 Z-Offset (as this is already set by the Z microswitch). We also need to disable any soft limit end-stops set during probing (M211S0) as the probe will try and probe below the Z-min (beta min) soft limit resulting in an error.

M280S7.43 = Raise the BL-Touch Pin
G4S1 = wait 1 second
G28 = Home X,Y and Z
M211S0 = Disable all soft limit endstops
M280S3.3 = Lower the BL-Touch probe pin
G32 = perform the levelling strategy
M500 = save results
M211S1 = Enable all soft limit endstops
As the Z Level is now determined by the microswitch, we can also use this same "levelling function" code in CURA before each print. the code is now generic for a printer with a BL-Touch so no special code per Printer setup is required.
Step 4:
We also need to adjust the soft limits on the MKS Setup to allow the Z height to go below 0 (the print bed at an angle can be heigher or lower than the Center reference Point which means we actually have a negative Z movement in some bed Areas on the first layers.
I set the soft limit at Z = -1 as the bed should not really be more "un-level" than this.

Which Option?... How to use the BLTouch everyday....
As you can see there are many options to use the BLTouch. It can be a part of the CURA startup or it can be part of the MKS TFT Screen.
If you have 1 3D printer then it makes sense to use the CURA Startup code and have the TFT buttons there as an extra. the G30Znn Level function can be integrated into the CURA Code.
If you have more than 1 printer running a BL-Touch and dont want to setup each printer in CURA then it makes sense to use options 2 or 3. I know that at somepoint I will use the wrong printer setup in CURA resulting in a mess.
(Each printer will have a slightly different Z-Offset, so using a standard GCode as part of CURA is difficult. Each printer would need its own special GCode ZOffset. (G30Zx.x) )
My standard way is to use Option 3 and Keep the Z-Axis microswitch for the bed height.
This way I can run a standard CURA code for all my printers without having to worry about the ZOffset.
Conclusion:
I hope this Information is not only useful to "Plug and Play", but to understand the options and limitations to using a probe. Maybe there is an even better setup possible. If you have another way to integrate the probe please let me know.